apkanalyzer(3)-走读dex/arsc解析命令

接下来选两个具体的命令,来走读一遍实现功能的流程、使用了哪些功能库。第一个选择解析dex的最后一个功能,打印指定类、方法的反编译代码;第二个选择资源文件解析的最后一个命令,输出指定xml二进制文件对应的可读版本。

1. 打印dex中某个类、方法的smali代码

首先,一定是从cli库中找到对应的命令枚举类型实现。

1
2
3
4
5
6
7
8
9
10
11
12
13
14
15
16
17
18
19
20
21
22
23
24
DEX_CODE("dex", "code", "Prints the bytecode of a class or method in smali format") {
public ArgumentAcceptingOptionSpec<String> classSpec;
public ArgumentAcceptingOptionSpec<String> methodSpec;
public OptionParser parser;
@Override
public OptionParser getParser() {
// 参数解析
if (this.parser == null) {
this.parser = super.getParser();
this.classSpec = (ArgumentAcceptingOptionSpec<String>)this.parser.accepts("class", "Fully qualified class name to decompile.").withRequiredArg().ofType((Class)String.class).required();
this.methodSpec = (ArgumentAcceptingOptionSpec<String>)this.parser.accepts("method", "Method to decompile. Format: name(params)returnType, e.g. someMethod(Ljava/lang/String;I)V").withRequiredArg().ofType((Class)String.class);
}
return this.parser;
}
@Override
public void execute(final PrintStream out, final PrintStream err, final ApkAnalyzerImpl impl, final String... args) {
final OptionParser parser = this.getParser();
final OptionSet opts = parseOrPrintHelp(parser, err, args);
// 解析dex部分
impl.dexCode(((File)opts.valueOf((OptionSpec)this.getFileSpec())).toPath(), (String)opts.valueOf((OptionSpec)this.classSpec), (String)opts.valueOf((OptionSpec)this.methodSpec));
}
},

在DEX_CODE类型的执行函数部分,可以找到impl类中对应的方法dexCode——ApkAnalyzerImpl类的功能函数代码如下:

1
2
3
4
5
6
7
8
9
10
11
12
13
14
15
16
17
18
19
20
21
22
23
24
25
26
27
28
29
30
31
32
33
34
35
36
37
38
39
40
41
42
43
44
45
public void dexCode(final Path apk, final String fqcn, String method) {
//解压apk文件
try (final Archive archive = Archives.open(apk)) {
final Collection<Path> dexPaths = Files.list(archive.getContentRoot()).filter(path -> Files.isRegularFile(path, new LinkOption[0]) && path.getFileName().toString().endsWith(".dex")).collect((Collector<? super Path, ?, Collection<Path>>)Collectors.toList());
boolean dexFound = false;
//遍历dex文件
for (final Path dexPath : dexPaths) {
//核心文件解析类
final DexBackedDexFile dexBackedDexFile = DexFiles.getDexFile(dexPath);
//核心文件反编译的管理类
final DexDisassembler disassembler = new DexDisassembler(dexBackedDexFile);
if (method == null) {
try {
//打印该文件的所有反编译代码
this.out.println(disassembler.disassembleClass(fqcn));
dexFound = true;
}
catch (IllegalStateException ex) {}
}
else {
final Optional<? extends DexBackedClassDef> classDef = (Optional<? extends DexBackedClassDef>)dexBackedDexFile.getClasses().stream().filter(c -> fqcn.equals(SigUtils.signatureToName(c.getType()))).findFirst();
//找到参数指定的方法
if (classDef.isPresent()) {
method = ((DexBackedClassDef)classDef.get()).getType() + "->" + method;
}
try {
//打印方法对应的反编译代码段
this.out.println(disassembler.disassembleMethod(fqcn, method));
dexFound = true;
}
catch (IllegalStateException ex2) {}
}
}
//异常情况处理
if (!dexFound) {
if (method == null) {
throw new IllegalArgumentException(String.format("The given class (%s) not found", fqcn));
}
throw new IllegalArgumentException(String.format("The given class (%s) or method (%s) not found", fqcn, method));
}
}
catch (IOException e) {
throw new UncheckedIOException(e);
}
}

流程比较明确,加了一些简单的注释。

第一步,解压APK

Archives工具类在apkanalyzer.jar中,open这个函数基本上是所有命令的调用必经之路——毕竟解析内容第一步就是解压APK文件。可以看到里面根据zip和其他两种情况,使用了不同的工具类来做解压:

1
2
3
4
5
6
7
public static Archive open(final Path archive) throws IOException {
if (archive.getFileName().toString().toLowerCase().endsWith(".zip")) {
return ZipArtifact.fromZippedBundle(archive);
}
final FileSystem fileSystem = FileUtils.createZipFilesystem(archive);
return new AndroidArtifact(archive, fileSystem);
}

open函数返回的Archive是个接口,具体如下:

1
2
3
4
5
6
7
8
9
10
public interface Archive extends AutoCloseable
{
Path getPath();
Path getContentRoot();
boolean isBinaryXml(final Path p0, final byte[] p1);
void close() throws IOException;
}

结合Archives来看,无非是使用java nio的一些文件工具,来实现解压方法。具体到AndroidArtifact上,有一些特殊的分析功能。

第二步,解析dex文件

DexBackedDexFile,该类在dexlib2-2.2.1.jar包中,包名路径是org.jf.dexlib2.dexbacked。这个包在sdk同目录下,也可以在网络上找到它的信息——dexlib2

dexlib2 is a library for reading/modifying/writing Android dex files

简单讲,这个库可以读、写、改dex文件,很多搞hook、修改dex的工具插件等黑科技都会使用到这个库。可以查询它的javadoc看它具体的功能接口。

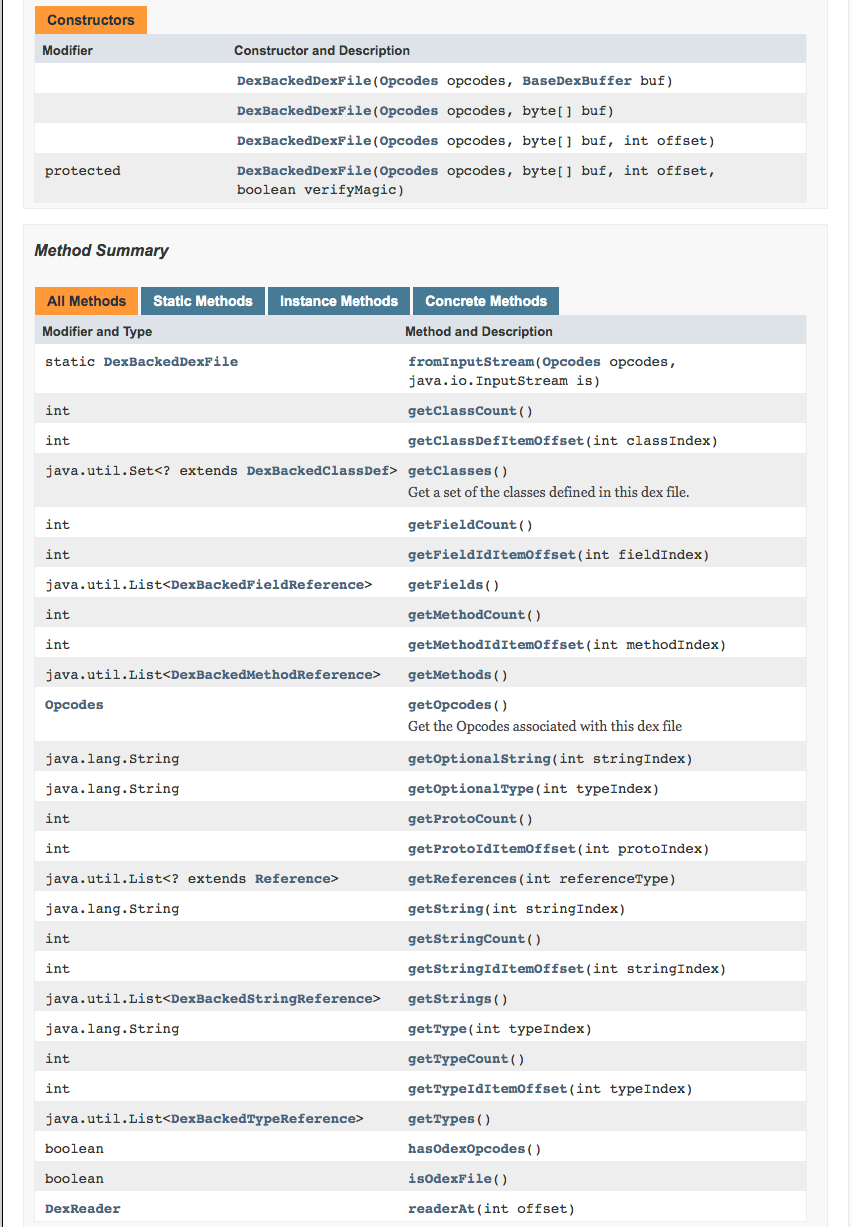
呃……不是很友好,没有什么注释的样子。这个类走读的话,看下构造就好了:

1
2
3
4
5
6
7
8
9
10
11
12
13
14
15
16
17
18
19
20
21
protected DexBackedDexFile(@Nonnull Opcodes opcodes, @Nonnull byte[] buf, int offset, boolean verifyMagic)
{
super(buf, offset);
this.opcodes = opcodes;
if (verifyMagic) {
DexUtil.verifyDexHeader(buf, offset);
}
this.stringCount = readSmallUint(56);
this.stringStartOffset = readSmallUint(60);
this.typeCount = readSmallUint(64);
this.typeStartOffset = readSmallUint(68);
this.protoCount = readSmallUint(72);
this.protoStartOffset = readSmallUint(76);
this.fieldCount = readSmallUint(80);
this.fieldStartOffset = readSmallUint(84);
this.methodCount = readSmallUint(88);
this.methodStartOffset = readSmallUint(92);
this.classCount = readSmallUint(96);
this.classStartOffset = readSmallUint(100);
}

成员属性的初始化,各种数据是如何从dex文件流中解析出来的,找对应的read函数就好了。

DexDisassembler 该类是apkanalyzer.jar里面的类,包名目录是com.android.tools.apk.analyzer.dex。它只有不到70行的长度,构造参数要求传入DexBackedDexFile实体,其中只有两个公用方法:

  • public String disassembleMethod(final String fqcn, final String methodDescriptor) throws IOException
  • public String disassembleClass(final String fqcn) throws IOException

逻辑也比较简单,通过构造传入的DexBackedDexFile实体,获得dex文件的解析的class信息,然后根据方法需要来输方法或者类的反编译信息。

第三步,根据参数要求输出,并处理异常情况

后面的输出逻辑也是一目了然的。根据是否有method参数,走不通的逻辑。有的话,查找对应的method;没有就输出整个类。如果找不到或者发生其他解析问题,抛出异常。

2. 把二进制XML文件的转换成可读的XML文件打印出来

相比而言,这条命令同样是代码的还原,只不过针对的是资源文件的二进制文件。同样的,找到对应的命令枚举类型的实现定义:

1
2
3
4
5
6
7
8
9
10
11
12
13
14
15
16
17
18
19
20
21
22
23
RESOURCES_XML("resources", "xml", "Prints the human readable form of a binary XML") {
public OptionParser parser;
private ArgumentAcceptingOptionSpec<String> filePathSpec;
//解析参数
@Override
public OptionParser getParser() {
if (this.parser == null) {
this.parser = super.getParser();
this.filePathSpec = (ArgumentAcceptingOptionSpec<String>)this.parser.accepts("file", "File path within the APK.").withRequiredArg().ofType((Class)String.class);
}
return this.parser;
}
@Override
public void execute(final PrintStream out, final PrintStream err, final ApkAnalyzerImpl impl, final String... args) {
final OptionParser parser = this.getParser();
final OptionSet opts = parseOrPrintHelp(parser, err, args);
assert this.filePathSpec != null;
//执行解析
impl.resXml(((File)opts.valueOf((OptionSpec)this.getFileSpec())).toPath(), (String)opts.valueOf((OptionSpec)this.filePathSpec));
}
};

同样具体功能函数会追溯到impl类中,找到对应的方法:

1
2
3
4
5
6
7
8
9
10
11
12
13
14
15
16
17
public void resXml(final Path apk, final String filePath) {
//解压apk
try (final Archive archive = Archives.open(apk)) {
final Path path = archive.getContentRoot().resolve(filePath);
//读文件
final byte[] bytes = Files.readAllBytes(path);
//校验
if (!archive.isBinaryXml(path, bytes)) {
throw new IOException("The supplied file is not a binary XML resource.");
}
//解析xml二进制码
this.out.write(BinaryXmlParser.decodeXml(path.getFileName().toString(), bytes));
}
catch (IOException e) {
throw new UncheckedIOException(e);
}
}

同样的open函数,解压好目标APK文件。在校验好文件类型后,调用了BinaryXmlParser的静态方法,该类在apkanalyzer.jar中,具体实现如下:

1
2
3
4
5
6
7
8
9
10
11
12
13
14
15
16
17
18
19
public static byte[] decodeXml(final String fileName, final byte[] bytes) {
//文件解析
final BinaryResourceFile file = new BinaryResourceFile(bytes);
final List<Chunk> chunks = (List<Chunk>)file.getChunks();
//各种情况处理
if (chunks.size() != 1) {
return bytes;
}
if (!(chunks.get(0) instanceof XmlChunk)) {
return bytes;
}
final XmlPrinter printer = new XmlPrinter();
final XmlChunk xmlChunk = (XmlChunk)chunks.get(0);
visitChunks(xmlChunk.getChunks(), printer);
final String reconstructedXml = "<?xml version=\"1.0\" encoding=\"utf-8\"?>\n" + printer.getReconstructedXml();
return reconstructedXml.getBytes(Charsets.UTF_8);
}

文件解析

核心的文件解析部分在binary-resources.jar中,即BinaryResourceFile、Chunk类,包名目录是com.google.devrel.gmscore.tools.apk.arsc。根据BinaryResourceFile的构造可以看出这一点:

1
2
3
4
5
6
7
public BinaryResourceFile(byte[] buf)
{
ByteBuffer buffer = ByteBuffer.wrap(buf).order(ByteOrder.LITTLE_ENDIAN);
while (buffer.remaining() > 0) {
this.chunks.add(Chunk.newInstance(buffer));
}
}

Chunk略上,贴一部分代码基本就可以看出,是个根据资源文件二进制的数据结构特点来处理的具体解析类:

1
2
3
4
5
6
7
8
9
10
11
12
13
14
15
16
17
18
19
20
21
22
public abstract class Chunk
implements SerializableResource
{
public static final int PAD_BOUNDARY = 4;
public static final int METADATA_SIZE = 8;
private static final int CHUNK_SIZE_OFFSET = 4;
@Nullable
private final Chunk parent;
protected final int headerSize;
protected final int chunkSize;
protected final int offset;
public static enum Type
{
NULL(0), STRING_POOL(1), TABLE(2), XML(3), XML_START_NAMESPACE(256), XML_END_NAMESPACE(257), XML_START_ELEMENT(258), XML_END_ELEMENT(259), XML_CDATA(260), XML_RESOURCE_MAP(384), TABLE_PACKAGE(512), TABLE_TYPE(513), TABLE_TYPE_SPEC(514), TABLE_LIBRARY(515);
private final short code;
private static final Map<Short, Type> FROM_SHORT;
...
}
...
}

各种情况处理

解析后有几种情况。具体情况需要分析BinaryResourceFile的具体实现,来看。这里不做深入。最后一种情况则是解析XmlChunk。对应的使用XmlPrinter,该类是BinaryXmlParser中的一个内部工具类。看代码基本可以推断是转化各种Chunk内容的一个内容管理类。通过visitChunks,把XmlChunk的各种属性、元素内容写入XmlPrinter,最终输出可读的xml内容。

这里面除了上面提到的binary-resources相关的工具类和数据Bean之外,还涉及到一个XmlBuilder类,包名目录是com.android.xml,在common-26.0.0-dev.jar中,用于组装xml的各种零部件。

小结

也仅仅是走读代码,读其大略而已。没有深入研究dex、arsc具体的文件格式。

  • sdk tools里面有很多工具jar,基本上可以包含所有的apk打包相关的各个环节
  • 了解一些反编译的细节之后,多少对打包这件事本身会有更进一步的掌控
感谢您赏个荷包蛋~